User Guide for Blender Queue AddOn v2.1
This guide is designed to provide you with direct instructions on how to use the “Blender Queue” AddOn (Version 2.1.0+), helping you batch render your projects and enhance your workflow.
If you would like to see the manual for an earlier version of Blender Queue, click here.

Installing the AddOn
To install the “Blender Queue” AddOn download the zip file. Ensure it remains zipped after download, especially Safari users who may need to re-zip it. In Blender, go to “Edit” -> “Preferences” -> “Add-ons”, click the ˅ icon in the top right corner of the Preferences window, then click “Install From Disk…”, select the zip, and click the “Install from Disk”. A new “Blender Queue” tab should appear in the 3D viewport’s right-side panel.
Step-by-Step Guide: Installing the “Blender Queue” AddOn
1. Downloading the AddOn
After completing your purchase, download the “Blender Queue” AddOn from the “order received” page. Alternatively, access it later via “My Account” -> “Downloads”.
2. Saving the Zip File
Save the downloaded zip file, named similarly to “blender_queue_v2_1_0-ut2pqd.zip”, in an easily accessible location, like your downloads folder. This file can be deleted after installation.
3. Maintaining Zip Format
Ensure the file remains in zip format. Safari users may need to re-zip the file if the browser automatically unzips it upon download by right-clicking the folder and selecting “Compress ‘blender_queue_v…’”.
4. Installing the AddOn in Blender
Older Blender Versions (3.5 – 4.1)
Open Blender -> Navigate through “Edit” -> “Preferences” -> “Add-ons”. Click the “Install…” button located at the top right, then use the “Blender File View” to find and select the zip file. Click “Install Add-on” at the bottom right. Check the enable box for “Blender Queue” to activate it. To save your changes, click the triple bar icon ≡ at the bottom left and select “Save Preferences”. Close the Blender Preferences window afterward.
Newer Blender Version (4.2 – …)
Open Blender -> Navigate through “Edit” -> “Preferences” -> “Add-ons”. Click the ˅ icon in the top right corner of the Preferences window, then click “Install From Disk…”, select the zip file, and click “Install from Disk”. Click the triple bar icon ≡ at the bottom left and select “Save Preferences”. Close the Blender Preferences window afterward.
5. Accessing Blender Queue
A new tab labeled “Blender Queue” should now be visible in the right-side panel of the 3D viewport. Press the N key to open it if it’s not already displayed.
General Usage of the AddOn
To utilize the “Blender Queue” AddOn, start by adding items to the currently opened project, which is named “My Project 1” by default. To add items, use the “Add Current .blend”, “Add Current Scene” or “Add Blend Files” button. Once files are added, you can quickly move between them by clicking on the item name and then the “Open Blend File” button. After completing your work on those files, open the Render Settings popup to ensure that all the main settings, such as output location, sample rate, and other options, are correct. If necessary, modify the settings and click “Save Changes.” Finally, click “Batch Render” to render your scenes.
Step-by-Step General Guide: Using the “Blender Queue” AddOn
1. Accessing the Blender Queue Panel
Locate the Blender Queue panel on the right side of the 3D viewport. If this menu is closed, press the N key on your keyboard to reveal it. Then, click on the “Blender Queue” tab among the vertical tabs.
2. Adding Items for Rendering
Under the “Add” panel, you’ll find the “Add Current .blend”, “Add Current Scene” and “Add Blend Files” buttons for adding project files to the render list.
Add Current Blend / Add Current Scene
If you have the desired blend file open, press the “Add Current .blend” button to add all the scenes from this file or “Add Current Scene” to add only the scene that is currently opened.
Add Blend Files
To add files without opening them, use the “Add Blend Files” button. This opens the Blender File View, allowing you to select one or multiple files. For a single file, click on it and then click “Add Blend Files” at the bottom right of the window. To select multiple files, hold down the Ctrl key and click on them sequentially, then press “Add Blend Files”.
3. Navigate Between Added Items
Once the items are added, you can quickly move between them by clicking the “Open Blend File” button next to the item’s name. This allows you to efficiently update files and perform similar tasks without spending extra time searching for files.
4. Open and Adjust Render Settings
Open the Render Settings popup to ensure that all the main settings, such as output location, sample rate, and other options, are correct. If necessary, modify the settings and click “Save Changes” to apply any modifications. These changes are not saved to the blend files, allowing you to perform quick preview renders without altering the final settings within the files.
5. Render Your Scenes
Click “Batch Render” to start rendering your scenes based on the configured settings.
Using the “Projects” Panel
The Blender Queue Projects Panel is a dedicated area for accessing and managing project files (.json). Each project file can have project items added to it, specifically scenes from different blend files for you to work on. Through this panel, you can create new project files, move them, rename them, load previously created ones, and change their order. The Projects Panel is a useful tool for keeping different projects separate and focusing only on the items related to the project you are currently working on.
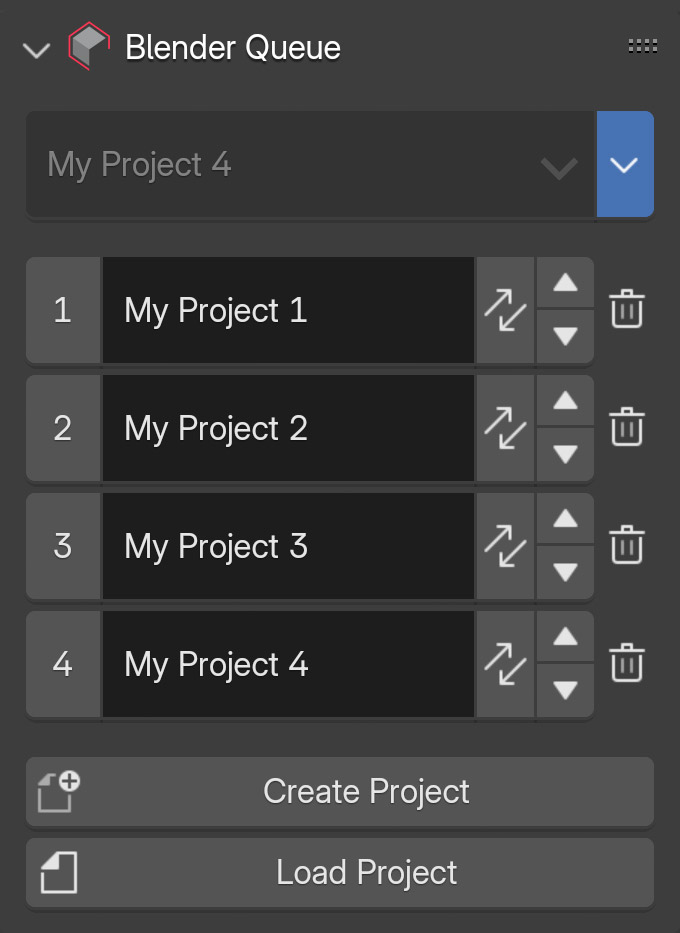
Managing and Organizing Project Files

Open the additional project panel settings by clicking the > button on the right side. Projects Panel List displays all created and added projects.
Each item has the following controls:
1. Enable/Disable project

Clicking the number on the left side of each row will disable the project, which can be useful if you want to temporarily hide it from the dropdown or disable it from rendering (if Render All Projects is enabled). Projects can be enabled in the same way by clicking the left-side area again.
2. Rename project

Each row displays the project name, which can be edited directly. This changes the name shown in the dropdown list but does not alter the json file name.
3. Move project to different location

Clicking the Move Project button opens a window where you can choose a new location for the project and rename the file if needed.
4. Reveal Project Location (Hold down CTRL)

Hover the mouse cursor over the Blender Queue AddOn and hold down CTRL to display the Reveal Project Location button. Clicking it will reveal the location of the project json file.
5. Change the order of the projects

Arrow up and arrow down buttons will allow you to change the order of projects. This affects the order in dropdown, and also the rendering order if you have checked the “Render All Projects” option under the “Batch Render” button.
6. Remove/Delete project

Button with the trash icon is for removing the project from the list. Clicking it opens a popup window that offers the option to remove the project from the list. If you mark the “delete the JSON file” checkbox, the .json file will be deleted from the hard drive after clicking OK.
7. Locate missing project

If a project file has been moved to a new location and is missing, a Locate Project button will appear for that item, allowing you to find and re-link the project file.
Creating a new project file
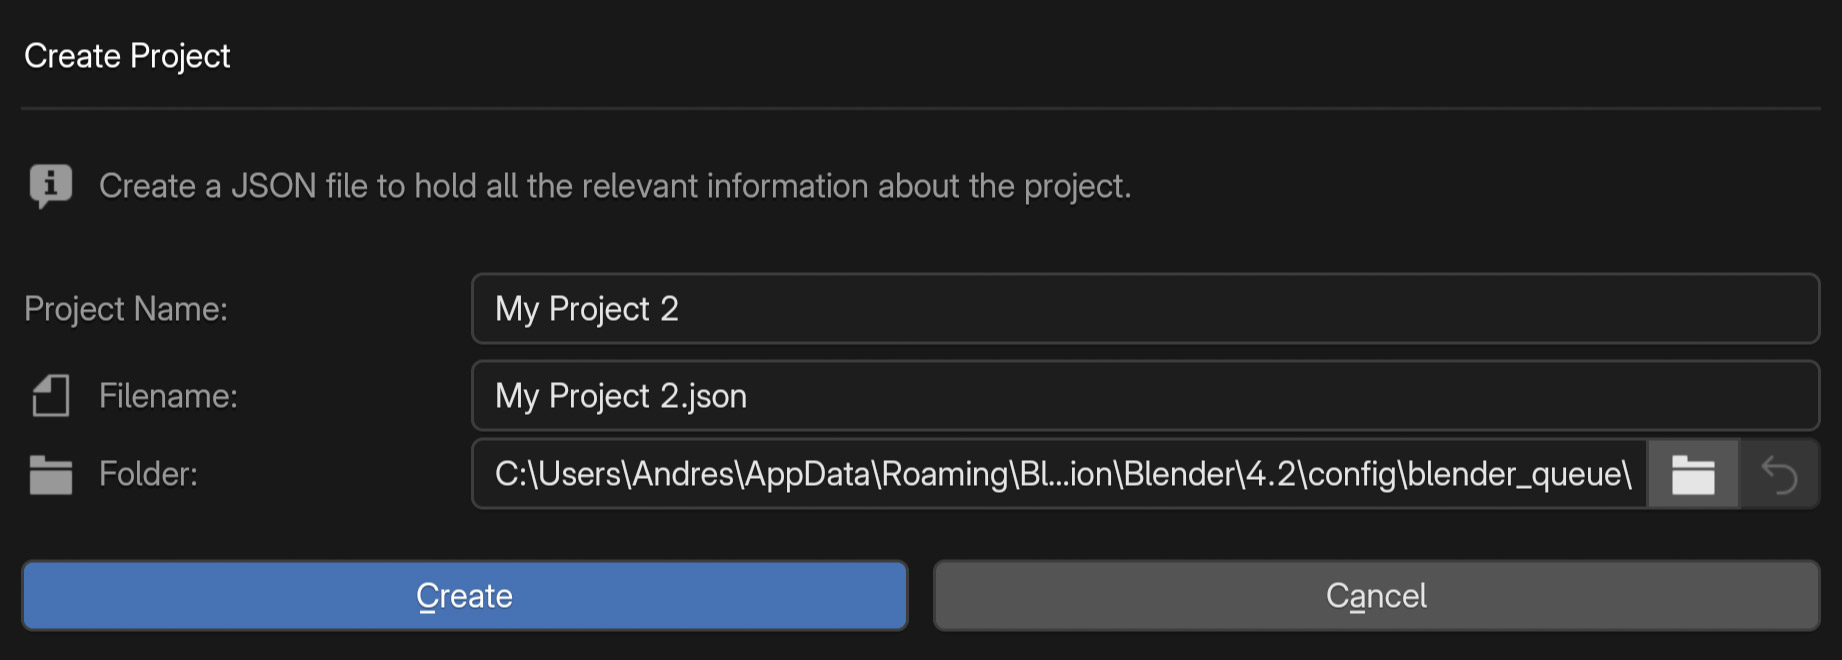
By default, after installation, the first project file is automatically created with the name “My Project 1”. However, if you would like to create another project file, follow these steps:

- Click the “Create Project” button.
- In the newly opened popup window, set the project name, which will appear later in the project list.
- The Filename is generated automatically after you have entered a project name, but you can change it if you prefer to name it differently.
- Optionally, choose a folder to save the project file. If you prefer to keep all files related to a project in one folder, then for example create a “Blender Queue” folder in your main project directory and save the .json file there. Otherwise it will be saved in a default Blender config folder.
- Next, click the “Create” button to finalize the project creation.
Loading a Project File

To add an existing project file to the projects list, use the “Load Project” button. It will open Blender’s file browser. Next, locate the .json project file you want to add, select it, and then click “Load Project” in the bottom right corner of the file browser.
Using the “Items” Panel
The “Items” panel in the “Blender Queue” AddOn is where you’ll manage the list of project files added for rendering. This panel is used for organizing and controlling how your projects are handled within the queue.

1. Enabling/Disabling Items for Rendering

Each project file in your list has a corresponding checkbox, represented by a number, that allows you to enable or disable it for rendering. Clicking on the number will disable the item from the batch rendering process without removing it from the list. To re-enable an item for rendering, simply click on the empty checkbox where the number previously was.
2. Opening Blend File Shortcut

By default, each item includes a shortcut button to open the associated blend file. However, by navigating to Edit -> Preferences -> Add-ons -> Blender Queue and scrolling to Interface Options for Closed Items, you can customize the shortcut buttons displayed for each item. Available options include:
- Play Animation
- Open Blend File
- Refresh File Info
- Open Output Folder
- Duplicate Item
- Edit Item
3. Accessing Dedicated Information and Controls

Each item in the list has a dedicated section where you can view specific information and access various controls. To open this detailed view, click on the item’s name. Learn about it in next section.
4. Reordering Items

You can change the order in which the project files are set to be rendered using the up and down arrow buttons next to each item in the list.
5. Removing Items

Should you need to remove a project file from the list entirely, you can do so on a file-by-file basis by clicking the trash can icon next to the respective item.
Item Information and Controls
Each item in the render list includes a section that displays key information about the item and provides shortcut buttons for various actions.

To open this area, simply click on the item’s name. For each item, the following buttons are available for use:
Play Animation
Allows you to playback and review the animation after rendering
Open The Blend File
Opens the corresponding .blend file and its associated scene directly.
By default, it will maintain the current workspace, allowing for optimal workflow between different files with similar tasks. If you prefer not to use this feature, you can disable it by going to Preferences -> Blender Queue Addon -> General Settings and unchecking “Preserve UI Layout When Opening a Blend File”.
If you hold down the CTRL key while clicking, it will open the folder where the .blend file is located.
Refresh File Info
Updates the main information of the item if there have been changes since the last update.
Values that are refreshed: Render Engine, Samples, Time Limit, Denoise, Motion Blur, Film Transparent, Use Tiling, Tile Size, Use Persistent Data, Use Compositing Nodes, Resolution X, Resolution Y, Resolution %, Frame Rate, Frame Range, Render Output Path, and Output Format
Updates occur automatically when the file is added to the list and also before rendering.
Open Output Folder
Opens the folder where the rendered output is or will be stored.
If the folder does not yet exist, clicking this button will prompt you to create it automatically. This can be useful if you want to open the folder before rendering to monitor files as they are generated.
Duplicate Item
Duplicates the item in the list.
This is useful if you want to experiment with different rendering settings using the same scene.
By default, this button is not displayed. To add it, go to Preferences -> Blender Queue Addon -> Item Details Visibility and check the box for “Duplicate Item”.
Edit Item
Here, you can change the display name of the item. You can also retarget the item to a different file and scene.
Item information
Beside the shortcut buttons, you’ll see a thumbnail of the project. After rendering, this thumbnail is replaced with the last rendered frame, giving you a quick visual reference of the render result.
Below the thumbnail, you’ll find key information about the item. By default, Blender Queue AddOn shows the following:
- Item Status: Indicates whether the item is “Scheduled” or “Rendered”, or shows a warning if there is an issue.
- Render Engine: The engine used for rendering the project.
- Samples: The number of samples set for the render.
- Time Limit: If a time limit per frame is set, it will be displayed here.
- Denoise: Indicates if denoising is turned on.
- Frame Range: The range of frames that will be rendered.
- File Format: The format in which the render output will be saved.
- Render Time: After rendering is complete, the render time for this item is shown.
You can also enable the following information going to Preferences -> Add-ons -> Blender Queue -> Interface Options for Expanded Items:
- Motion Blur
- Film Transparent
- Tiling
- Persistent Data
- Compositing Nodes
- Resolution
- Frame Rate
- Render Output Path
Using the “Actions” Panel
The “Actions” panel in the Blender Queue addon allows you to perform the following tasks with items added to the list: modify key render settings, remove or enable items, and batch render enabled items. Additionally, you can view the statistics of the most recent render.
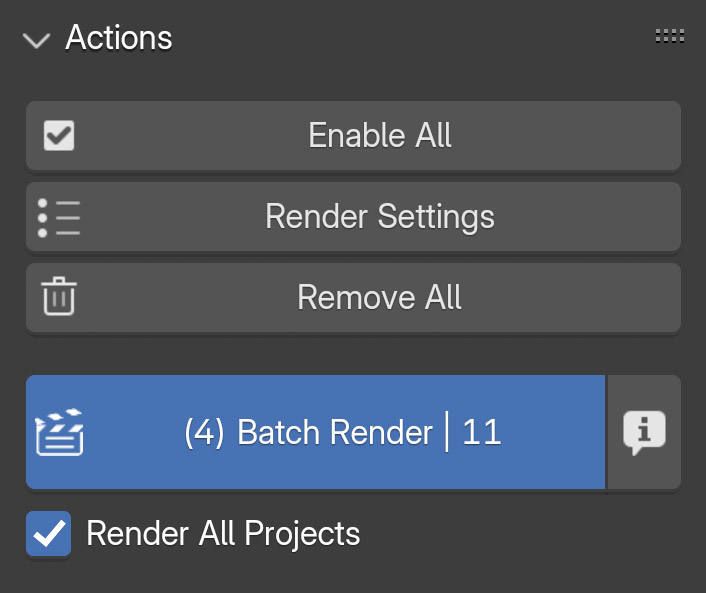
1. Enable All
The “Enable All” button allows you to quickly enable all inactive items in the current project. This feature is particularly useful if you have rendered multiple items (all rendered items are disabled after rendering) and wish to re-render them. With one click, you can reactivate these items.
By default, the “Enable All” button is not visible in the Actions panel. To use it, you need to activate it by going to Blender Preferences -> Blender Queue -> General Settings and checking the “Show Enable All Button” option.
2. Render Setting
Clicking the “Render Settings” button opens a popup window where you can adjust the main render settings for your items, such as the number of samples, output location, and more. These changes are not saved to the blend files, allowing you to perform quick preview renders without altering the final settings within the files. For more details on the Render Settings window, click here.
3. Remove All
Clicking the “Remove All” button will clear all projects from the list, regardless of whether they are enabled or disabled. If you hold down the Ctrl key while clicking this button, it changes to “Remove Unchecked“. This allows you to quickly remove all disabled projects from the list in one action.
4. Batch Render
The “Batch Render” button initiates the rendering process for all enabled items in the list. The number next to the “Batch Render” indicates the total count of projects queued for rendering. If rendering is in progress, clicking this button again or pressing Esc on keyboard will stop the rendering process. You can also find the “Batch Render” button in the main menu under “Render”.
5. Statistics
Clicking the info icon button next to the Batch Render button opens a popup window displaying the statistics of the most recent render. This summary includes the completion time, the rendered items, the time taken for each item, and the total render time. If any errors occurred during rendering, such as missing files, the statistics window will display error icons next to the affected items along with the error details.
6. Render All Projects
Below the Batch Render button is the “Render All Projects” checkbox. When checked, all enabled projects in the projects panel will be rendered. If unchecked, only the currently selected project from the dropdown list will be rendered.
“Render Settings” Popup

Click on “Render Settings” button in “Actions” panel to open the popup. In this window you can adjust the primary settings for items to be rendered, such as the number of samples, output location, and more. Changes made in this panel are not saved to the blend files, allowing for quick preview renders or other adjustments without altering the final settings stored in the blend files.

Default Fields in Render Settings Panel
By default, each item row in the Render Settings panel displays the following fields:
- Number in Render Order
- Item Display Name
- Render Engine
- Samples or Eevee Samples
- Denoise
- Resolution (Width, Height, %)
- Frame Range (Start, End)
- Output Path
- Output Format
Also, the Global Override Row is enabled, allowing you to easily make changes across all items for the corresponding columns.
Additional Fields from Preferences

In the ‘Render Settings’ window, click the Gear icon at the top-right corner to open the window settings. Here, you can enable additional fields:
- Time Limit
- Motion Blur
- Film Transparent
- Tiling
- Persistent Data
- Compositing Nodes
- Frame Rate
Validate and Adjust Render Settings Quickly
Render Settings popup with these fields provides a comprehensive overview before starting a render. For example, you can ensure all items have the correct output paths and that other critical settings are as required. The Render Settings popup allows you to quickly correct any errors and add items to the render queue without needing to open or modify files individually.
Revert Buttons
Each field has a revert button that allows you to reset the setting to its original value from the blend file. Additionally, the revert button at the beginning of each row, next to the item number, resets all fields in that row to their original values.
Saving and Canceling Changes
Once you have made the desired changes, selecting “Save Changes” will apply them. If you choose “Cancel,” all changes will be disregarded.